How to I access folders asking permission from S-1-5-21-1141541065-1878635876-2164326471-1001?

Hardware

2018/04/21 15:07

by  Namratha v s

My laptop was functioning on Windows 8.1pro. when I bought the laptop I had added a security system on the folders (some security system which was already present in my laptop and whose name I don't know). As I added on folders or downloaded stuff the security measure got attached to the folders, which I didn't know until recently. Apparently because of this security thing the folders will only open in Windows 8.1 pro on my laptop. I had transferred files from my laptop to my harddisk too. Without knowing this security thing getting tagged along, I updated my windows 8.1 pro to windows 10. Now when I connect my harddisk I am not able to open any of the files (the ones I made or downloaded in Windows 8.1 pro). Everything is locked. Unfortunately I have important documents which can't be opened or moved or copied too. Now when I tried to copy a folder, the system asked me to take permission from "S-1-5-21-1141541065-1878635876-2164326471-1001". Please do suggest a solution for this as soon as possible.
Thank you

Operating System:
Windows 10

Answer this question
Best answer

2018/04/24 09:48

by Christian Velasco

Hello Namratha,

Thank you for posting your concern here and I am sorry to hear about the copying issue you are experiencing.

Could you please try to follow the steps given and see if it resolves the issue:

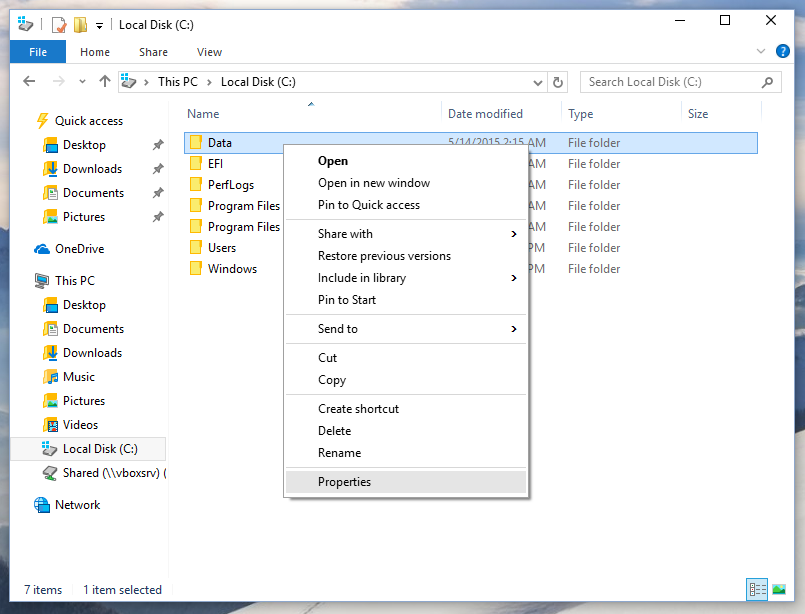
1. Please open File Explorer.

2. Select View tab.

3. Click Options

4. Uncheck the two options and click 'Clear'.


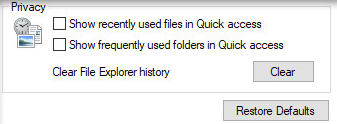
5. Then restart your computer and try to copy files from your hard drive.

If the problem persists, please let me know.

Sincerely,

Christian

  • 0 votes

    0
    0

    2018/05/20 04:46

    by Lokesh Yadav

    Hi Namratha,

    Please follow the below steps to get full permission on the folder.

    1. Open File Explorer, and then locate the file or folder you want to take ownership of.
    2. Right-click the file or folder, click Properties, and then click the Security tab.
      Windows 10 take ownership 1
      Windows 10 take ownership 2
    3. Click the Advanced button. The "Advanced Security Settings" window will appear. Here you need to change the Owner of the key.
      Click the Change link next to the "Owner:" label
      Windows 10 take ownership 3
    4. The Select User or Group window will appear.
      Windows 10 take ownership 5
      Select the user account via the Advanced button or just type your user account in the area which says 'Enter the object name to select' and click OK.
    5. Optionally, to change the owner of all subfolders and files inside the folder, select the check box "Replace owner on subcontainers and objects" in the "Advanced Security Settings" window. Click OK to change the ownership.Windows 10 take ownership 6 owner subcontainers
    6. Now you need to provide full access to the file or folder for your account. Right-click the file or folder again, click Properties, and then click the Security tab.
    7. Click the Add button. The "Permission Entry" window will appear on the screen:Windows 10 take ownership 7 permission for entry
    8. Click "Select a principal" and select your account:Windows 10 take ownership 8 select principal
    9. Set permissions to "Full control":
      Windows 10 take ownership 9 full control
      Click OK.
    10. Optionally, click "Replace all existing inheritable permissions on all descendants with inheritable permissions from this object" in the "Advanced Security Settings" window.
      Windows 10 take ownership 10 full access

    I hope this helps.

    Regards,
    Lokesh

    Edit your answer

    Cancel

    Add your comment

    Cancel


Don’t find the answer?

Feel free to ask our experts from around the world and to receive professional answers for it.

Ask your question

Community login

x

You must login to participate in the Community area. Creating an account is quick and easy

Join the community!

x
Minimum 8 characters.

Thank you for registering

x

We have sent a verification email to the email address you have specified.


After verifying your email address you will be able to log into the community area.