-
ReviverSoft
Answers
得到的答案我們
計算機專家社區打印word doc和PDF但是從我的hp打印機出來的空白紙張。
 我喜歡這個問題0 喜歡跟隨它從未發生過。今天嘗試達到hp支持並獲得此網站鏈接。請幫我4個月前買的。操作系統:Windows 10回答這個問題最佳答案
 嗨,傑森,
嗨,傑森,
打印機正在工作,但打印輸出缺少黑色或彩色墨水,或打印的頁面為空白或墨水很少。要解決此問題,請僅使用原裝HP墨盒。此外,您可以取出黑色墨盒,僅使用三色墨盒打印,更換任何空的或有缺陷的墨盒,或清潔打印頭。
解決方案一:使用原裝HP墨盒HP建議您使用原裝HP墨水或碳粉耗材。 HP無法保證非HP或重新填充墨盒的質量或可靠性。如果您不使用原裝HP墨盒,則本文檔中的步驟可能無法解決問題。要查看墨盒的真實性,請訪問hp.com/go/anticounterfeit 。請按照以下步驟檢查墨水量,然後更換任何低墨盒或空墨盒。第1步:檢查估計的墨水量
請按照以下步驟檢查估計的墨水量。注意:
墨水量警告和指標僅為規劃目的提供估算值。當指示燈顯示墨水量不足時,請考慮更換墨盒以避免可能的打印延遲。在打印質量變得不可接受之前,您無需更換墨盒。- 在紙盒中裝入普通白紙。
- 觸摸按鈕(
 )在“設置”圖標旁邊(
  )在控制面板的左下角。
 - 觸摸向右箭頭按鈕(
 )選擇工具,然後點擊確定。
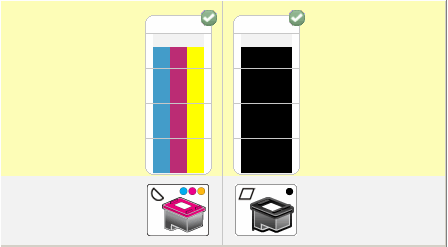
 - 觸摸向右箭頭按鈕( )選擇“估計墨水量”,然後點擊“確定”。 圖:顯示完整墨盒的估計墨水量圖形
- 如果沒有墨盒墨水不足 ,則無需更換墨盒 。繼續下一個解決方案。
- 如果任何墨盒墨水不足 ,請繼續執行下一步更換墨盒 。
第2步:更換任何低墨盒或空墨盒
請按照以下步驟更換任何低墨盒或空墨盒。- 在進紙盒中裝入普通白紙。
- 按電源按鈕打開打印機。
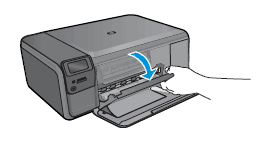
- 打開墨盒門。等待打印機空閒並保持靜音,然後再繼續。 圖:打開墨盒門
- 輕輕按下墨盒以將其釋放,然後將墨盒拉出以將其從插槽中取出。 圖:取出墨盒

注意:請勿觸摸銅色觸點或墨水噴嘴。另外,請勿重新粘貼墨盒。這樣做可能會導致堵塞,墨水故障和電氣連接不良。
圖:請勿觸摸觸點或噴嘴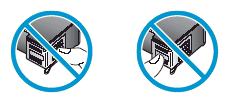
- 從包裝中取出新墨盒,然後拉動拉片以取下塑料膠帶。
注意:請勿觸摸銅色觸點或墨水噴嘴。另外,請勿重新粘貼墨盒。這樣做可能會導致堵塞,墨水故障和電氣連接不良。
圖:取下塑料膠帶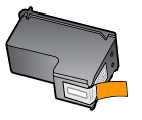 握住墨盒兩側,使噴嘴朝向打印機,然後將墨盒插入帶有顏色標記的插槽,直至其卡入到位。確保墨盒上的圖標與插槽上的圖標匹配。
 - 將三色墨盒插入左側的插槽中。
- 將黑色墨盒插入右側插槽中。
- 將墨盒向前推入插槽,直至其卡入到位。
- 如有必要,請重複這些步驟以更換另一個墨盒。
- 關閉墨盒門。
- 確保打印機已打開並裝入紙張。
- 觸摸按鈕(
 )在“設置”圖標旁邊( )在控制面板的左下角。
 - 觸摸向右箭頭按鈕( )選擇工具,然後點擊確定。
- 觸摸向右箭頭按鈕( )選擇“對齊打印機”,然後點擊“確定”。打印機打印對齊頁面。
- 抬起打印機蓋。
- 將對齊頁打開,打印面朝下放在掃描儀玻璃板的右前角。請參閱掃描儀玻璃板旁邊的雕刻導板,以獲取有關加載校準頁的幫助。
- 關閉蓋子,然後按OK完成對齊。
- 等待打印機掃描校準頁並完成校準過程。
第3步:對齊打印機
請按照以下步驟校準墨盒。解決方案三:使用自動工具清潔打印頭
如果出現打印問題,打印頭可能會堵塞。按照以下步驟運行自動工具清潔打印頭。- 在進紙盒中裝入普通白紙。
- 觸摸按鈕( )在“設置”圖標旁邊( )在控制面板的左下角。
- 觸摸向右箭頭按鈕( )選擇工具,然後點擊確定。
- 觸摸向右箭頭按鈕( )選擇清潔打印頭,然後觸摸確定。打印機啟動清潔過程。
注意:清潔過程中的機械噪音是正常的。清潔過程結束時打印測試頁。
- 在打印頭測試頁上查看打印質量。如果打印質量仍然不可接受,請按照說明運行二級清潔。您可能需要多次清潔打印頭才能恢復最佳打印質量
解決方法:以備份模式打印
如果您需要立即打印並且無需考慮打印輸出的質量,則可以在備份模式下打印。如果您沒有替換墨盒,仍可以墨水備份模式打印。只需取出問題墨盒,然後使用剩餘墨盒進行打印。- 如果刪除三色墨盒,打印輸出將為灰度。
- 如果取出黑色或照片墨盒,產品打印速度會慢,打印輸出中的顏色可能會有所不同。
問候,
LOKESH
有沒有解答。
歡迎光臨 Reviversoft Answers
ReviverSoft答案是一個地方要問您對您的計算機,並經專家社區回答任何問題。張貼您的問題
問你的問題到現在社區類似的問題
Problemet skjedde的noen定時器siden,埃特在JEG hadde jobbet MED filen。 Filen ER På CA 13代爾。 Hadde akkurat lagret filen OG krysset UT字。 Skulle森德filen過郵件,男性達JEG trykket"插入文件"我的Hotmail,FANT JEG IKKE filen。菅直人IKKE菲內書房noen賽普拉斯,hverken MED聚光燈埃勒我發現者。 SER IKKE UT索姆書房ligger På分MAC我DET餄餎TATT。查看答案9
